DNN990HD/DNN770HD>2. Basic Operations>2.3 Turning on the Navigation System

2.3 Turning on the Navigation System

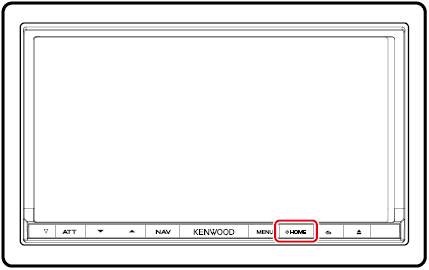
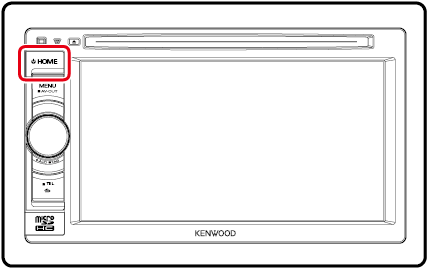
The method for turning on the power varies between different models.

DNN990HD

  1. 1Press the <HOME> button.

    51680.png

  2. The navigation system is turned on.

  • To turn off the navigation system:

    Press the <HOME> button for 1 second.


DNN770HD

  1. 1Press the <HOME> button.

    53600.png

    The navigation system is turned on.

  • To turn off the navigation system:

    Press the <HOME> button for 1 second.

If it is your first time turning the navigation system on after installation, it will be necessary to perform Initial setup.


Login

  1. 1Select the login user.

    When the owner has not been registered

    login-0.png

    When the owner has been registered

    login-3-1.psd

  2. 2Enter the password.

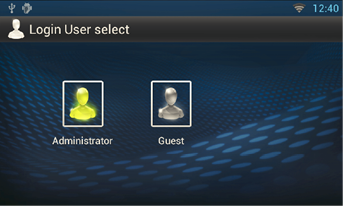
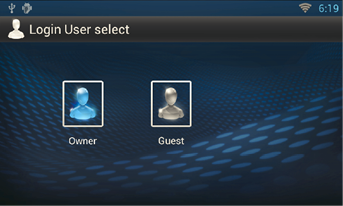
    When you selected Administrator or Guest, you do not need to enter a password.

    login-3-2.psd

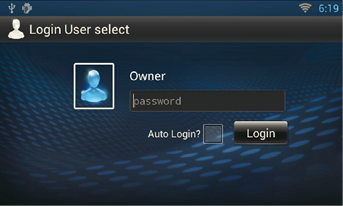
    [Auto Login?]: Checking this checkbox allows you to log in to the system automatically from the next time.

  3. 3Touch [Login].
NOTE

Initial setup

Perform this setup when you use this navigation system for the first time or when you reset the unit. See Resetting the Navigation System.

  1. 1Set each item as follows.

    InitialSetup1.png

  2. Language Setup

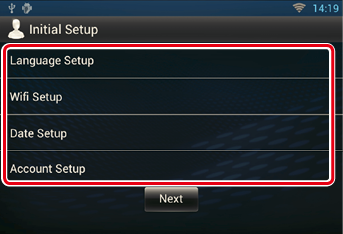
    Select the language used for the GUI and input methods. Default is “English (United States)”.

    1. Touch [Language Setup].
    2. Select a language from the list.
    3. After setting, press the < 6 > button twice.
    WiFi Setup

    Configure settings for connection to Wi-Fi.

    1. Touch [WiFi Setup].
    2. Slide Wi-Fi to ON.
    3. Select the Wi-Fi access point to register from the list.
    4. Input the Password.
    5. Touch [Connect].
    6. After setting, press the < 6 > button.

    For details on operation, see Wi-Fi Setup.

    Date Setup

    Set the date and time.

    1. Touch [Date Setup].
    2. Touch [Select time zone].
    3. Select a time zone.
    4. After setting, press the < 6 > button.

    For details on operation, see Clock and Date Setup.

    Account Setup

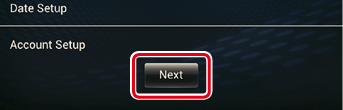
    Set the information about the user of this navigation system.

    1. Touch [Account Setup].

    For details on operation, see About Account.

  3. 2Touch [Next].

    InitialSetup2.png

  4. 3Set each item as follows.

    InitialSetup3.png

  5. Language

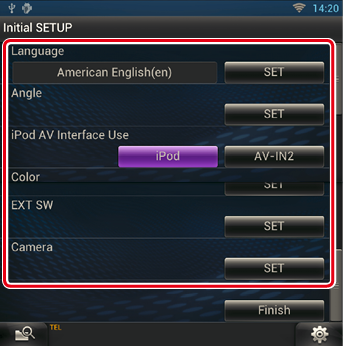
    Select the language used for the control screen and setting items. Default is “American English (en)”.

    1. Touch [SET].
    2. Touch [C] or [D] to select the desired language.
    3. Touch [Enter].

    For details on operation, see Language setup.

    Angle (DNN990HD only)

    Adjust the position of the monitor. Default is “0”.

    1. Touch [SET].
    2. Touch desired angle number and [ return_key2.PNG ].

    For details on operation, see Monitor angle control.

    iPod AV Interface Use

    Set the terminal which your iPod is connected to. Default is “iPod”.

    1. Touch [iPod] or [AV-IN2].

    Color

    Set the screen and button illumination color. You can select whether to allow color scan operation or select a fixed color for operation.

    1. Touch [SET].
    2. Touch [ON] or [OFF] of [Panel Color Scan].
    3. If you want to change color, touch [SET] of [Panel Color Coordinate].
    4. Touch your desired color and [ return_key2.PNG ].

    For details on operation, see Panel color coordinate.

    EXT SW (DNN990HD only)

    Control the external devices.

    1. Touch [SET].
    2. Set device name, output pattern, and pulse set for device. Then, touch [ return_key2.PNG ].

    For details on operation, see EXT SW setup.

    Camera

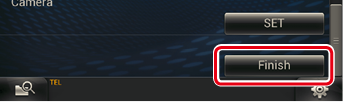
    Set the parameters for the camera.

    1. Touch [SET].
    2. Set each item and touch [ return_key2.PNG ].

    For details on operation, see Camera Setup.

    Demo mode

    Set the demonstration mode. Default is “ON”.

    1. Touch [ON] or [OFF].
  6. 4Touch [Finish].

    InitialSetup4.png

NOTE
  • These settings can be set from the SETUP menu. See Setting Up.

Contents