INSTRUCTION MANUAL
DNN9250DAB/ DNN6250DAB/ DNR8025BT
CONNECTED NAVIGATION SYSTEM / CONNECTED MONITOR WITH DVD RECEIVER

INSTRUCTION MANUAL
CONNECTED NAVIGATION SYSTEM / CONNECTED MONITOR WITH DVD RECEIVER
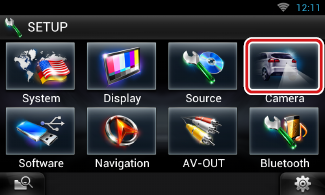
You can set camera parameters.
 ] on any screen.
SETUP Menu screen appears.

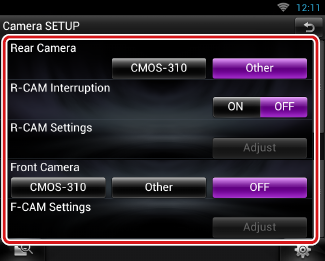
Camera SETUP screen appears.

|
Rear Camera*1 |
|
Select the type of rear camera to use. CMOS-310: When the CMOS-3xx series with ID 1 set is connected. Other (Default): When the other camera is connected. |
|
R-CAM Interruption |
|
Set a method for switching the display. Setting values are ON and OFF. ON: Switches to the rear view camera video display when shifting to reverse or pressing the <NAV>*4/<APPS>*4 button for 1 second. OFF (Default): Switches to the rear view camera video display when pressing the <NAV>*4/<APPS>*4 button for 1 second. |
|
R-CAM Settings*2 |
|
Adjust the CMOS-3xx series with ID 1 set. For details, see the instruction manual of your camera. |
|
Front Camera*1 |
|
Select the type of front camera to use. CMOS-310: When the CMOS-3xx series with ID 2 set is connected. Other: When the other camera is connected. OFF (Default): When the front camera is not used. |
|
F-CAM Settings*3 |
|
Adjust the CMOS-3xx series with ID 2 set. For details, see the instruction manual of your camera. |
*1 These settings become settable only when the parking brake is on.
*2 This setting becomes settable only when the parking brake is on and the CMOS-3xx series is selected.
*3 This setting becomes settable only when the parking brake is on and “Front Camera” is set to [ON].
*4 [NAV/APPS Key Longer than 1 Second] must be set to “CAM”. See User interface.